
Go To: Using An Image Pack.| Black and White Effect.| Color Effect 1.| Smooth, Dreamier Skin.| A 3 in 1 Glittery Text Tutorial.
Using An Image Pack:
-May be used since I did not make this up on my own, though I did write it so please don't copy and paste!
- Note: This is assuming you got the image pack already downloaded, extracted from the zip file (right click on it usually) or from a link to another page that only has the pictures of the brushes on it (like I have).
- When you have the pictures of the brushes infront of you, you will need to open them up individually in your image editing program. This is simple, don't make it harder than it is. You could even do this in MS Paint before taking it to your main editing program. Just use your cut tool to cut out each brush one at a time, then take one of them over to your editing program. (You could copy it or save it then open it up.) MAKE SURE THE BRUSHES ARE IN BLACK AND WHITE!
- In PHOTOSHOP: Once the soon to be brush is open, go to EDIT>DEFINE BRUSH and it will ask you to name the brush and you're done. Do that for each brush.
- In GIMP (This might only work in version 2.6 or higher, but you can try it): Once the brush is opened in GIMP, change the mode by going to IMAGE>MODE and change it to GRAYSCALE. Then copy the brush, EDIT>COPY, and paste it as a new brush by going to EDIT>PASTE AS>NEW BRUSH. A window will pop up, rename the brush and click OK. Do this for all of them and you're done :)
____________________________________________________________________________________
Black and White Effect: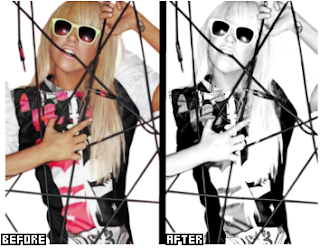

- Grab an image. It can be pretty much anything. I'm using a picture of Lady Gaga which you can get here if you want.
- Go to COLORS>LEVELS and copy my settings.
- Next, go to COLORS>CURVES and change the input (x) to 159, and the output (y) to 202.
- Go to COLORS>DESATURATE>LUMINOSITY.
- Now go to COLORS>BRIGHTNESS-CONTRAST> and put -52 in for brightness, and 43 in for contrast.
- Finally, duplicate the image, and set it to Dodge 20%. You may have to mess with these settings a little depending on the image.
- Merge layers.

Difference between this and regular black and white?

_________________________________________________________________________

- For this I am using another picture of Lady Gaga. You can get it here. Open it up.
- Duplicate the layer and set it to Overlay 100%.
- Duplicate that layer again and set it to Screen 67%.
- Make a new layer and fill it with the color #ece9d8 and set it to Color 100%.
- Make a new layer and fill it with the color #ffadd9 and set it to Difference 55%.
- Duplicate the original layer, drag it to the top, and set it to Value 100%.
- Take the Burn tool, change it to shadows, go over the whole image once; then just go over her head.
- Duplicate the original layer one more time, drag to the top, and set it to Overlay 100%.
- Merge the layers, and you're done! :)
_____________________________________________________________________________________

Once you have it opened up, duplicate it.
Go to FILTERS>BLUR>SELECTIVE BLUR and put 4.00 in for Blur Radius, and put 51 in for Max. Delta.
Duplicate the layer you were just working on.
Duplicate that layer again and go to FILTERS>ARTISTIC>CARTOON and put 6.00 in for Mask Radius, and 0.000 in for Percent Black.
Duplicate the original layer and drag it to the top. Set it to Screen 30%.
If there are any small imperfections still, use the Smudge tool to get rid of them by smudgeing away the imperfections. (Works great with acne.)
Merge layers and you're finished. Pretty easy :)
TIP: With some images you may want to duplicate the original layer, drag it to the top, set it to overlay, and lower the opacity if the image is looking too fake. It will add some texture.
*You may have to alter the numbers a bit depending on the image.
*You may have to alter the numbers a bit depending on the image.
FINAL RESULT:

__________________________________________________________________________
Glittery, Glossy, Reflecting Text. A 3 in 1 Tutorial:

Open a new, preferably white, document and create a new layer. LAYERS>NEW LAYER.
Grab the Text tool and type out whatever you want in the color you want. My font size is 47 px.
Merge the text layer down and grab the Fuzzy Select tool. Select all the letters by holding down Shift as you select.
Create a new layer and make sure it's highlighted. Go to EDIT>STROKE SELECTION. Make sure you stroke it with the color white, a line width of about 1 px, and a solid line.
Create a new layer. Stroke the selection again, but this time with a pattern like this (I do not own this pattern and I don't remember who does), a line width of 2 px, and make the line dashed by going to Line Styles and picking one that doesn't have too big a space between them.
Deselect everything by going to SELECT>NONE. Use a brush like this (I did create this brush; if you don't know how to use an image pack, go to my image pack tutorial on the top of the page. The pattern works the same way, but go to "New Pattern" instead of brush) and add sparkles on to the text like in mine above by using a really light gray color, then going back over it but slightly to the side (not directly over it) in white.
Now you can stop there and just merge your layers, OR to create a glossy look to it, merge all but the bottom blank white (or whatever color you're using) layer by hiding it, and then right clicking one of the visable layers and clicking "Merge Visable Layers". Unhide the bottom layer.
Create a new layer and use the Rectangle Select tool to make a box over half the text. Fill it with the color white and lower the opacity of the layer to about 40%. You can merge the layers and stop there, OR keep going to make the text have a reflection.
Once again, merge all but the bottom blank layer, and then unhide it again.
Duplicate the layer the text is on and flip it by going, LAYER>TRANSFORM>FLIP VERTICALLY. Make sure they line up and that there's only a sliver of space between the two of them.
Select the Eraser tool and with an opacity of about 50%, and with a soft brush, erase the upside down text. Make sure all of the upside down text is light, but only erase away about half of it, and not completely. See mine if you need and example.
Merge all layers, and if the sparkles need to be, you can go over them a little more. ANDDD you're done! :D


I especially like the smooth skin tut. Very helpful. Five stars! *****
ReplyDelete